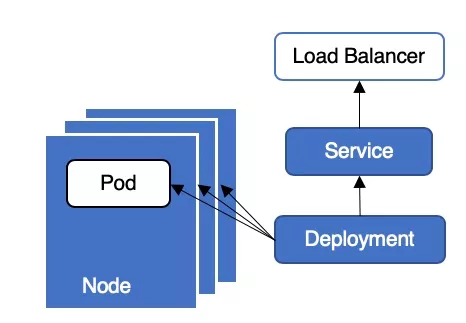
In a Kubernetes cluster, businesses usually use Deployment + LoadBalancer type Service to provide external services. The typical deployment architecture is shown in Figure 1. This architecture is very simple to deploy and operate, but service interruptions may occur when applications are updated or upgraded, causing online problems. Today we will analyze in detail why this architecture will cause service interruption when updating applications and how to avoid service interruption.
Why does the service interruption occur?
During rolling update of Deployment, new pods will be created first, and old pods will be deleted after waiting for the new pods to run.
1. Create a new Pod
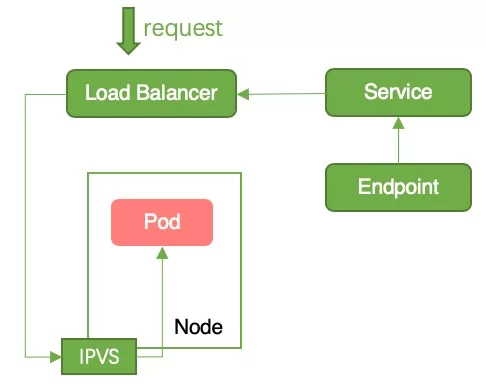
Cause of interruption: The Pod was added to the Endpoint backend after running. The container service monitored the Endpoint changes and added the Node to the LB backend. At this time, the request is forwarded from the LB to the Pod, but the Pod business code has not been initialized and cannot process the request, resulting in service interruption, as shown in Figure 2.
Solution: Configure readiness detection for the pod, wait for the business code to be initialized, and then add the node to the LB backend.
2. Delete Pod
In the process of deleting the old pod, it is necessary to synchronize the status of multiple objects (such as Endpoint, ipvs/iptables, LB), and these synchronization operations are performed asynchronously. The overall synchronization process is shown in Figure 3.
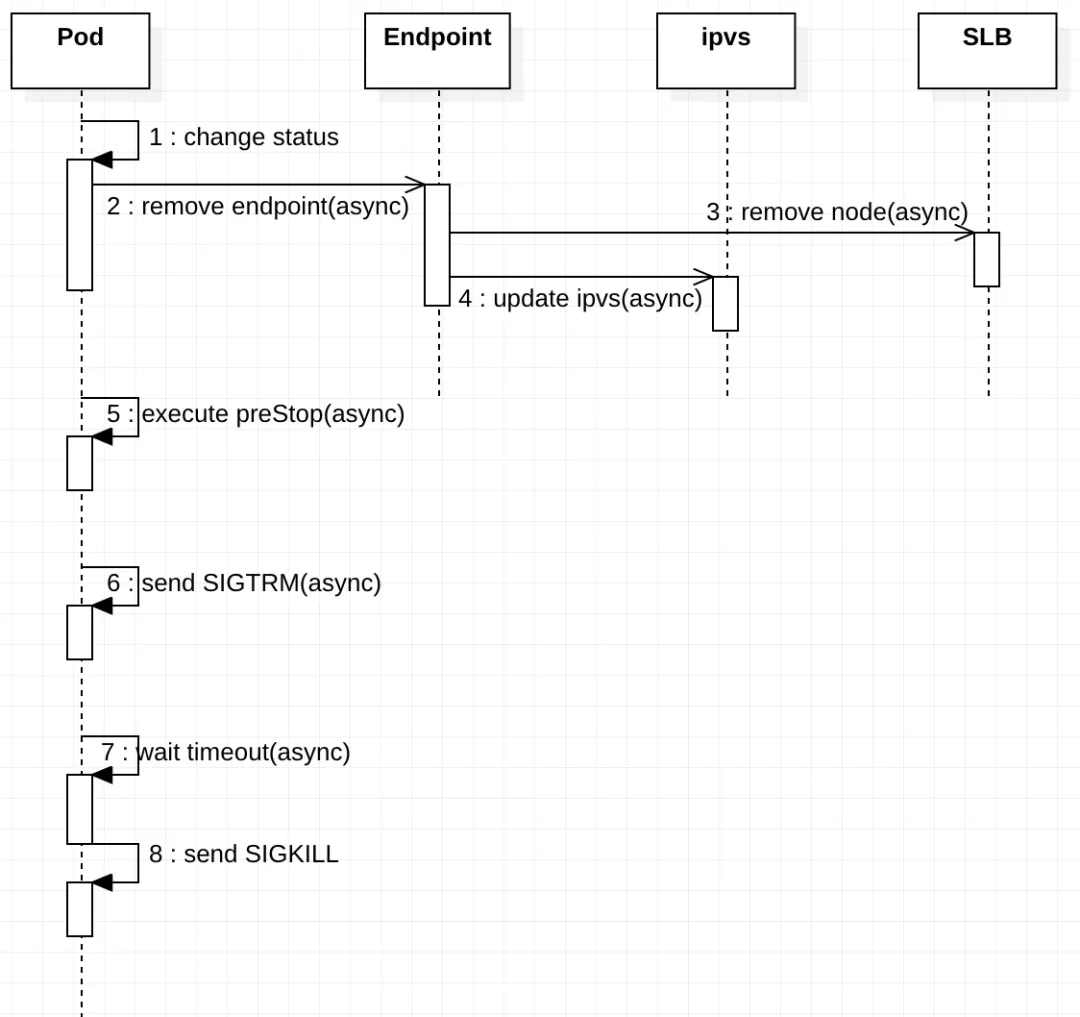
Pod deletion process
Pod status change: Set the Pod to Terminating status and remove it from the Endpoints list of all Services. At this point, the Pod stops receiving new traffic, but the containers running in the Pod will not be affected;
Execute preStop Hook: preStop Hook will be triggered when the Pod is deleted. preStop Hook supports bash scripts, TCP or HTTP requests;
Send SIGTERM signal: Send SIGTERM signal to the container in the Pod;
Wait for the specified time: The terminationGracePeriodSeconds field is used to control the waiting time, the default value is 30 seconds. This step is executed at the same time as preStop Hook, so terminationGracePeriodSeconds needs to be greater than the time of preStop, otherwise the pod will be killed before preStop is completed;
Send SIGKILL signal: After waiting for the specified time, send SIGKILL signal to the container in the pod and delete the pod.
Endpoints are not deleted in time
Cause of interruption: The above steps 1, 2, 3, and 4 are performed at the same time, so it is possible that the Pod has not been removed from Endpoints after receiving the SIGTERM signal and stopping working. At this point, the request is forwarded from lb to the pod, and the pod has stopped working, so there will be a service interruption, as shown in Figure 4.

Solution: Configure preStop Hook for the pod so that when the pod receives SIGTERM, it sleeps for a period of time instead of stopping immediately, thereby ensuring that the traffic forwarded from the LB can continue to be processed by the pod.
iptables/ipvs rules are not deleted in time
Cause of interruption: When a pod becomes the termintaing state, the pod will be removed from the endpoints of all services. kube-proxy will clean up the corresponding iptables/ipvs entries. After the container service watches the endpoint changes, it will call lb openapi to remove the backend. This operation will take a few seconds. Since these two operations are performed at the same time, it is possible that the iptables/ipvs entries on the node have been cleared, but the node has not been removed from lb. At this time, traffic flows in from lb, but there is no corresponding iptables/ipvs rule on the node, causing service interruption, as shown in Figure 5.
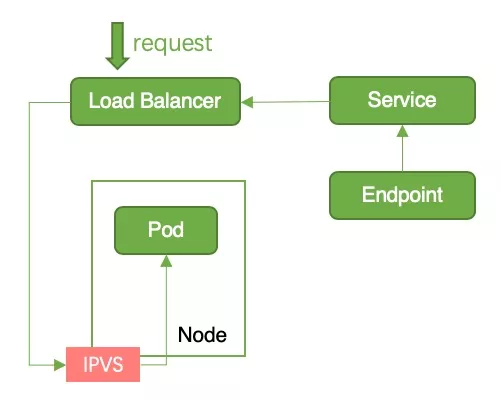 The solution is as follows:
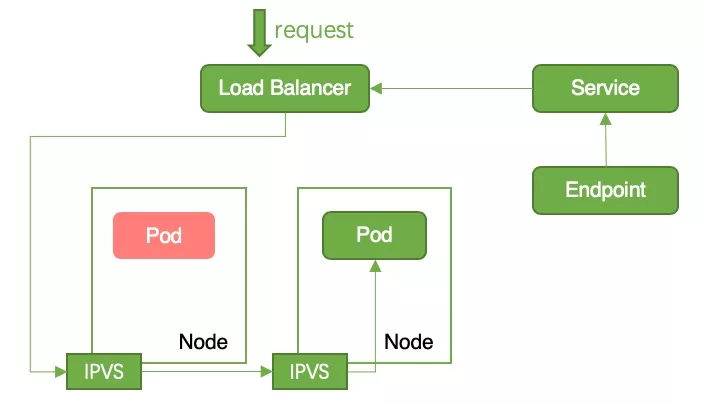
Cluster mode: In Cluster mode, kube-proxy will write all business Pods into the Node’s iptables/ipvs. If the current Node does not have a business pod, the request will be forwarded to other Nodes, so there will be no service interruption. , as shown in 6;
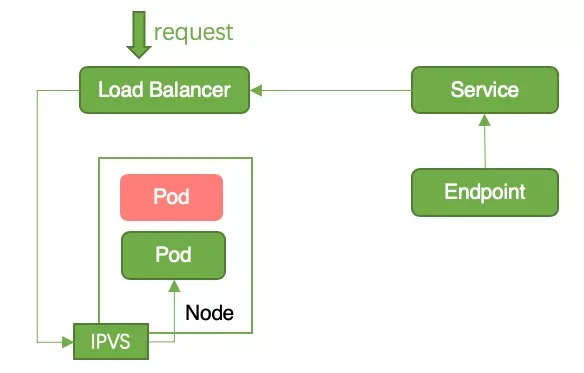
Local mode: In Local mode, kube-proxy will only write pods on Node to iptables/ipvs. When there is only one pod on a Node and the status changes to terminating, iptables/ipvs will remove the pod record. At this time, when the request is forwarded to this node, there is no corresponding iptables/ipvs record, causing the request to fail. This problem can be avoided by in-place upgrade, that is, ensuring that there is at least one Running Pod on the Node during the update process. In-place upgrade can ensure that there will always be a business pod record in Node’s iptables/ipvs, so there will be no service interruption, as shown in Figure 7;
How to avoid service interruption?
To avoid service interruption, you can start with Pod and Service resources. Next, we will introduce the corresponding configuration methods for the above interruption reasons.
1. Pod configuration
apiVersion: v1
kind: Pod
metadata:
  name: nginx
  namespace: default
spec:
  containers:
  - name: nginx
    image: nginx
    # 存活检测
    livenessProbe:
      failureThreshold: 3
      initialDelaySeconds: 30
      periodSeconds: 30
      successThreshold: 1
      tcpSocket:
        port: 5084
      timeoutSeconds: 1
    # Readiness detection
    readinessProbe:
      failureThreshold: 3
      initialDelaySeconds: 30
      periodSeconds: 30
      successThreshold: 1
      tcpSocket:
        port: 5084
      timeoutSeconds: 1
    # Exit gracefully
    lifecycle:
      preStop:
        exec:
          command:
          - sleep
          - 30
  terminationGracePeriodSeconds: 60
Note: The detection frequency, delay time, unhealthy threshold and other data of the readiness detection (readinessProbe) need to be set appropriately. Some applications have a long startup time. If the set time is too short, it will cause the POD to restart repeatedly.
livenessProbe is a survival detection. If the number of failures reaches the threshold (failureThreshold), the pod will restart. For specific configuration, see the official documentation;
readinessProbe is a readiness check. Only after the readiness check passes, the pod will be added to the Endpoint. The container service will only mount the node to the lb backend after monitoring the Endpoint changes;
It is recommended that the preStop time be set to the time required for the business to process all remaining requests, and the terminationGracePeriodSeconds time is recommended to be set to the preStop time plus more than 30 seconds.
2. Service configuration
Cluster ExternalTrafficPolicy Mode(externalTrafficPolicy: Cluster)
apiVersion: v1
kind: Service
metadata:
  name: nginx
  namespace: default
spec:
  externalTrafficPolicy: Cluster
  ports:
  - port: 80
    protocol: TCP
    targetPort: 80
  selector:
    run: nginx
  type: LoadBalancer
Container Service will mount all nodes in the cluster to the backend of LB (except those configured with the BackendLabel label), so it will quickly consume the LB quota. LB limits the number of LBs that can be mounted on each ECS. The default value is 50. When the quota is consumed, new monitoring and LBs cannot be created.
In Cluster mode, if the current node has no business pod, the request will be forwarded to other Nodes. NAT is required when forwarding across nodes, so the source IP will be lost.
Local ExternalTrafficPolicy Mode(externalTrafficPolicy: Local)
apiVersion: v1
kind: Service
metadata:
  name: nginx
  namespace: default
spec:
  externalTrafficPolicy: Local
  ports:
  - port: 80
    protocol: TCP
    targetPort: 80
  selector:
    run: nginx
  type: LoadBalancer
- It is necessary to ensure that each node has at least one Running Pod during the update process.
- Ensure rolling update in place as much as possible by modifying UpdateStrategy and using nodeAffinity
- UpdateStrategy can set Max Unavailable to 0 to ensure that new pods are started before stopping the previous pods.
- First label several fixed nodes for scheduling
- Use nodeAffinity+ and the number of replicas that exceeds the number of related nodes to ensure that new Pods are built in place as much as possible
For example:
apiVersion: apps/v1
kind: Deployment
......
strategy:
  rollingUpdate:
    maxSurge: 50%
    maxUnavailable: 0%
  type: RollingUpdate
......
    affinity:
      nodeAffinity:
          preferredDuringSchedulingIgnoredDuringExecution:
        - weight: 1
          preference:
              matchExpressions:
            - key: deploy
              operator: In
              values:
              - nginx
By default, the container service will add the node where the Pod corresponding to the Service is located to the LB backend, so the LB quota is consumed slowly. In Local mode, requests are forwarded directly to the node where the pod is located. There is no cross-node forwarding, so the source IP address can be retained. In Local mode, you can avoid service interruption through in-place upgrade. The yaml file is as above.
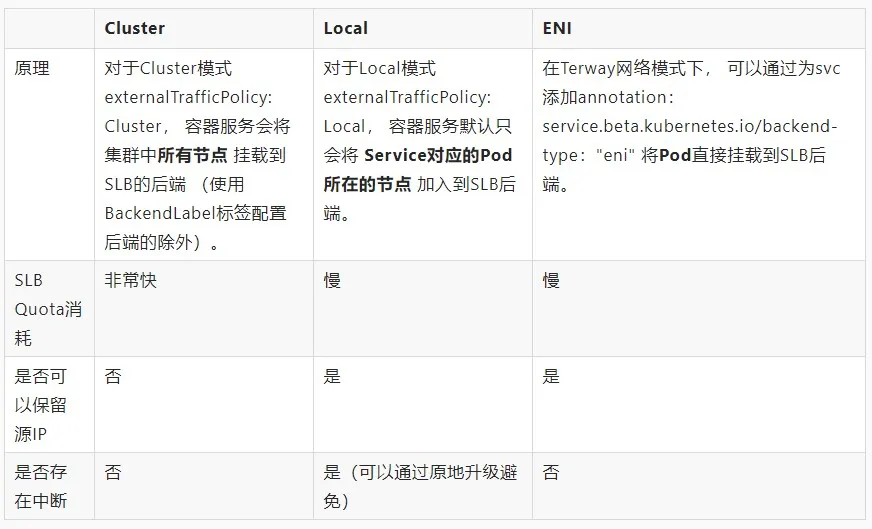
The comparison of the three svc modes is shown in the figure below:
3. Conclusion
If there are not many LBs in the cluster and there is no need to retain the source IP: select cluster mode + set Pod graceful termination + readiness detection;
If there are a large number of LB in the cluster or the source IP needs to be reserved: select local mode + set Pod graceful termination + readiness detection + in-place upgrade (make sure there is at least one Running Pod on each node during the update process).